Step 2: Design & Manufacture
So you have the building and area you want us to put our amazing play in to. What happens next?
What we need to get started
What we need first is plans and dimensions!
We can arrange to send one of our sales team to meet with you, on site, to survey and measure the area(s) - but we typically don't need to wait for this before we can make a start on the design. If you can provide us with some rough overall dimensions, this is normally enough of a starting point for us. Architectural plans and photos of the area(s) are even better, but you'd be surprised at what we can work with!

One big thing to remember - we need the heights in the building as well as the floor plan!
One big thing to remember, especially if you are keen for us to design a soft play structure - we need the ceiling heights as well as the floor plan! The height available in the building will determine the number of tiers we can get into the soft play structure design. The height will also determine the biggest slide we can fit in the design too - it's the thing the children look for first, so we typically start the design there!
The Design Process
The Building Layout
So we have the dimensions (and the ceiling height!) what happens next? Well the first stage of the design process is what we call a 'Building Layout'. This floor plan might not look like much of a design, but it is key to establishing the brief:
- what types of play we will include - soft play, soft play structure, sports court etc. Deciding what type of play equipment is going to best suit your needs is very important.
- the area(s) we will be working in
- how these area(s) will influence the surrounding space for things like seating
- importantly, it helps us establish a capacity and budget
The building layout is also ideal for inclusion as part of any planning application.
As all Soft Brick designs are completely bespoke you can work very closely with our design team to create your perfect play area. Changes to 'Building Layouts' are very quick and straight forward so it is important the 'Building Layout' is agreed before proceeding to the next stage, where the design starts to come to life - a full 3D design!
The 3D Design
So you've agreed the Building Layout, you're happy with the brief and what we're proposing for the design. Now the fun bit starts!
The 3D design is produced based on the Building Layout, but we take it much further by filling out the grid system with products from our extensive range! Everything from netting to slides, biff bash bags to ball pools - all gets carefully considered, located and placed within the system to create a unique and bespoke design.
None of our designs are the same - every one of our designs is as unique as our customer's requirements!

Theming
The 3D visuals we create are based on our standard 3D template of themes. These illustrations may not accurately represent the theming ideas you have for your play area - don't panic! This is because every one of our designs is manufactured to your specific requirements - so you can literally choose any theme you like, from Jungle to Space, Ice Cream Factory to just a range of colours (no theme at all!) - we are the best at what we do!
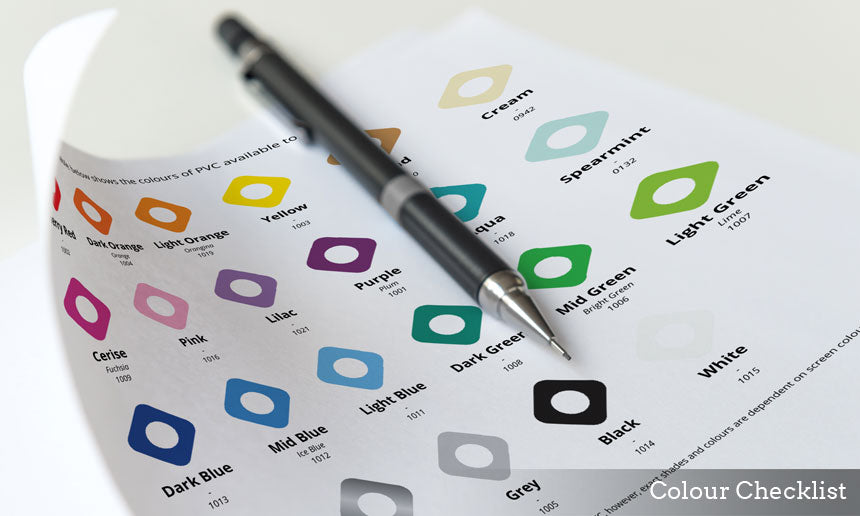
Once you're happy with the content of the design - the actual products included, then our design team will produce what we call a Colour Checklist. This list provides you a complete breakdown of every play product, floor pad, section of netting, column wrap etc that is in the design, together with a suggested colour and theme. This list is then sent to you for approval allowing you to make changes if you wish! The PVC colour swatch below shows the range of PVC we have available for all our appliquéd products.
Already have your own branding or characters you would like us to incorporate into the design? No problem! We can work with your existing artwork and incorporate this into the design of the products or theming. Our artists are incredibly skilled at replicating artwork in PVC to ensure it looks great but importantly that it lasts.

Designing play areas everyday, we have learned what colours work best where. For example, we prefer to use blue netting as a standard as it gives the impression of increased clarity and therefore improved supervision from the outside. We also tend to use yellow PVC on the column wrap verticals. Using yellow elsewhere, for example on floor padding, would result in the yellow looking grubby more quickly.
PVC Colour Swatch
The table below shows our range of PVC colours.
 |
 |
 |
 |
 |
 |
||
| Cherry Red - 1002 | Dark Orange - 1004 | Light Orange - 1019 | Yellow - 1003 | Sand - 1010 | Cream - 0942 | ||
 |
 |
 |
 |
 |
 |
||
| Cerise - 1009 | Pink - 1016 | Lilac - 1021 | Purple - 1001 | Aqua - 1018 | Spearmint - 0132 | ||
 |
 |
 |
 |
 |
 |
||
| Dark Blue - 1013 | Mid Blue - 1012 | Light Blue - 1011 | Dark Green - 1008 | Mid Green - 1006 | Light Green - 1007 | ||
 |
 |
 |
 |
 |
 |
||
| Brown - 1020 | Silver - 1017 | Grey - 1005 | Black - 1014 | White - 1015 |
Please note: We have tried to accurately reproduce the colours of our PVC, however exact shades and colours can be dependent on screen colour settings and printer setups. Colours are correct as of 06/02/2015.
Print or Appliqué?
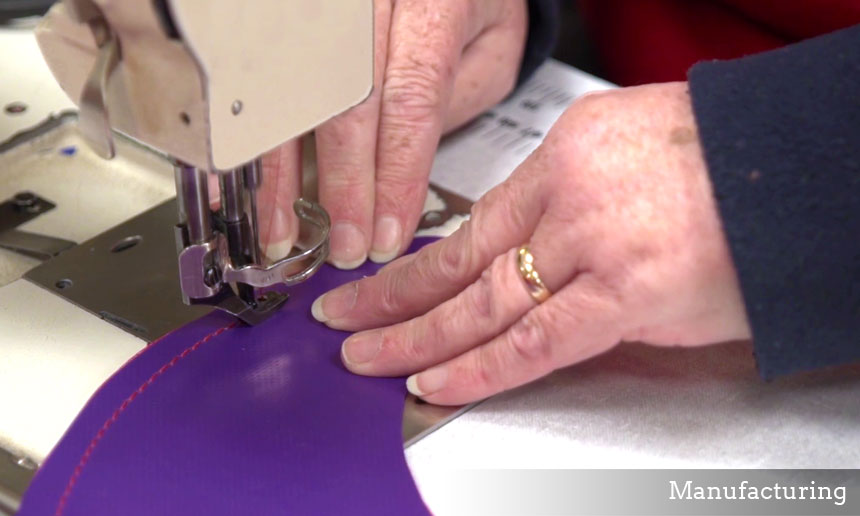
Customers sometimes assume we print all our PVC and themed items. We do in fact use both printing and a technique called Appliqué. Appliqué involves the layering up of precision cut PVC - using the colours available in the colour swatch - to create the overall effect. There are pros and cons to both techniques, the differences between them and where / how we use them are highlighted below.

|
Digitally Printed PVC Pros:
|
Cons:
|
|
Appliqué Technique Pros:
|
Cons:
|
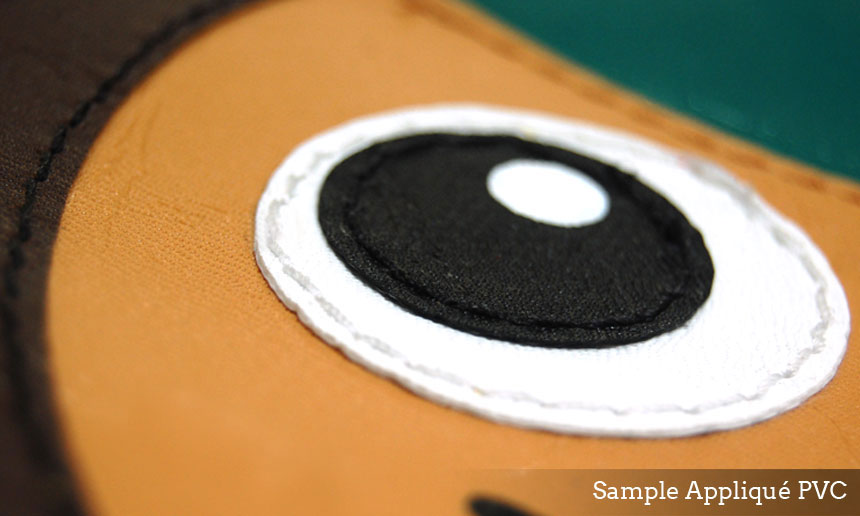
Our manufacturing techniques include exceptionally skilled cutting and hand finishing which results in a unique look and feel to all our soft play areas and soft play structures, making our products immediately recognisable to many! For your customers, the benefits are magnified and repeat usage is encouraged - more customers use our play more often as a result. Not all soft play is the same!
So you have a great design, chosen your theme and you're happy with the quotation. What's the next stage?
Specification
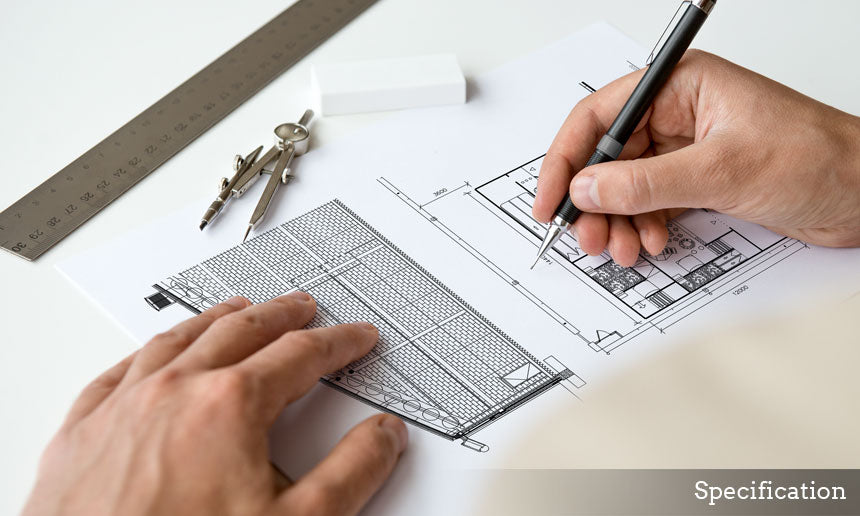
We have always been immensely proud of our heritage, not only as manufacturers and designers, but also as engineers. As soft play has evolved into soft play structures, we expanded design and manufacturing capacity to include the ability to create complex structures and environments. The ability to install our structures into often tricky or difficult spaces (between pillars, beams, linking mezzanines etc) would not be possible without our dedicated, in-house engineering team.
Post design but pre manufacture your project is handed over to our engineers, who will manage every aspect of your project, start to finish. On confirmation of an order, your allocated engineer will carry out an accurate site survey and assess other factors that might affect installation and access. We will then produce accurate specification drawings for the design before starting manufacture of any product. We can liaise directly with other site contractors to ensure a smooth installation program.
If designers create the dream, engineers make it happen!


Click here to go to the third and final step, Step 3: Project Management & Installation.
Alternatively, if you would like to discuss any of the above information in detail, then please get in contact with our team or call us on +44(0)1925 837733 and we will be more than happy to discuss it with you.